Wednesday, 4 December 2013

Error Deploying Visual Studio Workflows: Assembly signing failed


Hello Guys.

I had this C# Visual Studio 2013 code which was already in use, I had made modifications to it and it really needed to be deployed. But Alas, I click on "Deploy" and get the error message below

Error 1 Assembly signing failed; output may not be signed -- Error signing assembly -- The process cannot access the file because it is being used by another process.  {SolutionName}


I stopped for a moment to think what was done wrongly. I tried Cleaning, Rebuilding, Closing and Reopening the solution. But Alas, to no avail.

Then I checked all the opened projects and found out that the same signed on user had opened the same project solution. So all I had to do was close the close other opened project solution with the same name, deployed, and Viola, ERROR DISAPPEARED

So whenever you come across this such errors, check your opened projects.


Friday, 18 October 2013

CREATING A SHAREPOINT 2013 FARM USING SQL ALIASES, FROM POWER SHELL


You may be very well used to creating your SharePoint farm simply by running configuration wizard.

Here is a way to create it using PowerShell, and an already created SQL Server Alias.


1.  Open SharePoint 2013 management shell as administrator.
2.  You will see this error message at the top: “The local farm is not accessible. 
     Cmdlets with FeatureDependencyId are not registered.” Do not panic. This is expected because a                farm has not yet been created.

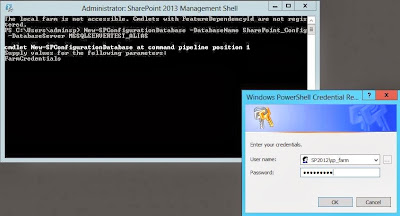
3.  Type in the following PowerShell command at the prompt, and press enter
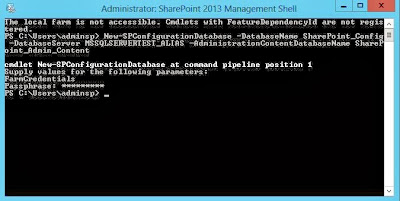
“New-SPConfigurationDatabase -DatabaseName SharePoint_Config -DatabaseServer MSSQLSERVERTEST_ALIAS -AdministrationContentDatabaseName SharePoint_Admin_Content”
Where MSSQLSERVERTEST_ALIAS is the sql server alias you would have created on your SharePoint server
NB: Change the databsase server name to the name of the database alias you have created.
Check here on howto create SharePoint SQL server database aliases.

4.  You would be immediately prompted to enter your farm credentials. This credentials are the a                       account you want as farm admin account. For me it’s sp_farm.

 5.  Next you will be prompted for passphrase. Clear the existing ****************** which you see(if it       pops up), and enter any value you wish as your passphrase. Remember it well, as it would be 
       needed should you have cause to join another server to the farm.

You may get an error stating
“Cannot connect to database master at sql server < MSSQLSERVERTEST_ALIAS> { ie  <ServerAliasName>. The database might not exist, or current user might not have permission to connect to it.


If you get this error, continue with step 6. Else proceed to steps 10

6.  Try to verify that the error has nothing to do with your PowerShell commands, try creating the farm 
            using SharePoint configuration wizard.

 7.  If the error persists, then check that your alias was created properly. Check here on how to createSharePoint SQL server database aliases.
8.  If the SQL Aliasing part is ok, then confirm that the account you are creating the farm with, which                 you must have also installed SharePoint with (now this is not the account you provided as farm admin            account, but the account you ), which is “adminsp” in my case, has the following permissions in the                database server “dbcreator”, ”security admin”. Go to your sql server, connect to your instance, and          expand Security > Logins, then right click on this account, select server roles. Then give the appropriate        permissions.


9.  If this is in place, and the error still persists, ensure that you don’t have firewall turned on. If they                   are, create a windows firewall rule on you sql server. Go to your Windows firewall on your SQL                   server, on the left, click on ”advanced settings”. Select “Inbound Rules” > “new rule”. For the rule type,         select “port”. For the Protocol and ports, Select TCP, then enter your sql specific port number. Action,         select “Allow this port number”. Select the profile, then Give the rule a name that you can remember.


10.  With all these in place, you should be OK with proceeding with your farm creation. This should create 2         database tables for you “SharePoint_Config” and “SharePoint_Admin_Content”.

11.  When your PS commands are done with the farm creation, the cursor would return to its blinking state.

     12.  Next, open SharePoint 2013 products configuration wizard and run the wizard. When prompted for port       number, specify the port number you want for your SharePoint central administration and select NTLM         Authentication.

Tuesday, 8 October 2013

CREATING A SHAREPOINT SQL SERVER ALIAS


What is an SQL Alias? 

This is a name used to reference your database, via which any application connecting to the database can connect. So if you have say, a SharePoint farm, that needs to access your SQL server, rather than point the SharePoint farm to the actual database name, you could create an alias, to which you will point the SharePoint server. It is this alias that would in turn, point to the actual SQL server.

Why the need for an SQL alias?

Should there be any need whatsoever for your SQL server to be changed, if you want to use a different server there would be confusion on the SharePoint server, because the farm would look for its existing databases and not find them. The initial server name used would have registered itself everywhere on the farm, and this cannot be changed.
I hear someone say, if the need for this arrives, I’d provision a new SQL server with the same server mane as the previous, and same instance name or cluster name as the previous. While this might prove a solution to this case, it should also be worthy of note that this could be time consuming, time which may not be a readily available might have to be expended. Also, the old server might still be used by other applications.
To curb all these, it is necessary to create an alias, when creating a SharePoint farm for the first time, use the alias name as the SQL server name. So if there is the need for the server hosting SharePoint to change, the appropriate databases are backed up from the old server, and restored to the new one, then the alias pointing to the old server now points to the new server.

To create an SQL alias, you have to run both the 32 and 64 bit SQL tool.      

1.       RUN THE 32 BIT SQL TOOL

          C:\windows\system32\cliconfg.exe
On the general Tab, ensure that TCP IP is enabled 


Next, go to the “alias tab” and select “add”.


Then enter the name you wish to use as alias, and your actual server instance name or cluster name. Also enter your port number.


(In the event that you have to change your SQL server, it is in this “Server name” text box you would have to enter the name of the new server, so even if SharePoint still has the alias name, it points to this new server).

To get your port number, run the SQL server configuration manager tool.

SQL Server Network Configuration > Protocols for [SQLSERVERNAME], select TCP IP, click on the
IP addresses tab. Then check the port number from the “TCP Port” section.


2.       RUN THE 64 BIT SQL TOOL

      C:\windows\SysWOW64\cliconfg.exe, and repeat all the steps done for 32 bit tool.


When you are done with that, run the SQL server configuration manager.
Go to SQL Native Client 11.0 Configuration> aliases. Right click alias, select new, and then enter the values.


When done with that, it should look somewhat like this.


Repeat same process for SQL Native Client 11.0 Configuration (32 bit)
Then you can use the alias in place of the SQL server\instance name whenever you need to refer to the server. In the creation of a SharePoint farm, this name could be used.
Now, here is a bit of an over sight that really gave me a night of headache when creating my SharePoint farm. For those using a cluster, this might not be much of a trouble. But here I was using a SQL server name\instance name.
I kept getting the error:
“Cannot connect to database master at sql server < MSSQLSERVERTEST_ALIAS> { ie  <ServerAliasName>. The database might not exist, or current user might not have permission to connect to it.

I thought there was something wrong with my PowerShell scripts. So I decided to create the farm using farm configuration wizard.
But lo, same problem persisted. After a whole night of time wasting, I found out that when registering my aliases on my WFE server, I used just instance name


Rather than server name\instance name.


This is what my connection to SQL looks like


So unless you are using an SQL cluster (where you would then have to enter your cluster name), in the place of server name, do ensure to enter your server name\instance name. Else you want to waste a whole lot of time trouble shooting.

Good luck.